No products in the cart.
Ford F250 Front Bumpers – A Detailed Guide
Here’s a compact, “everything-you-should-know” rundown on Ford F-250 Super Duty front bumpers—covering OEM construction, sensors/tech, service/removal, towing/plow prep, and what to watch for with aftermarket swaps. All of these bumpers can be found in our handy parts catelog under the exterior body parts category.
 F-250 OEM Front Bumper: What’s There
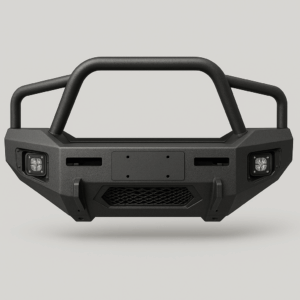
- Shell + reinforcement + energy absorbers. Steel bumper shell/face bar bolts to frame horns with brackets; below it sits a lower valance/air dam (varies by trim/year). Fog-lamp openings and tow-hook cutouts are common on many trims. Example kit for 1999–2004 includes the face bar, lower valance, valance extension, and fog lamps—with tow-hook and air holes noted in the spec.
- 2017+ trucks: new body/chassis (aluminum body, revised front-end) but the bumper remains a steel assembly with interchangeable valances and provisions for sensors/cameras depending on options. The official Ford parts catalog page for a 2017 F-250 shows the front bumper & components (valance, sensors, brackets) as individual service parts.
Front Sensors & Tech That Affect F-250 Bumpers
- Parking sensors (if equipped): round ultrasonic sensors snap into bumper bezels; harness plugs into the bumper. Aftermarket bumpers must provide correct bezel seats or sensor cups to avoid false alerts. Several aftermarket brands explicitly state “parking sensor ready” or provide separate instructions to transfer sensors.
- Adaptive Cruise Control (ACC) radar: 2017+ Super Duty places the radar behind a pod/section of the lower driver-side bumper area. When you swap bumpers you typically need a relocation bracket to move the radar to the grille or a clear window, or choose a bumper designed for ACC. Owners who replace the bumper without relocating report pre-collision/ACC warnings until it’s moved and aimed.
- Front camera (if equipped): some bumpers may block the OEM forward camera; many manufacturers call this out (camera may be “partially obstructed”).
Towing & Recovery Points at the Bumper
- Factory tow hooks mount to the front frame horns and poke through the bumper openings/valance. They’re serviceable as separate parts (e.g., HC3Z-17A954-A). Some vendors even sell color-accent tow hooks for 2017–2026 Super Duty that bolt into the factory locations.
Snow-Plow, Winch & Accessories
- Winch compatibility: OEM bumpers generally aren’t winch-ready. Aftermarket “replacement” bumpers frequently add winch plates, D-ring tabs, and light bar pockets—but check sensor/ACC notes (some require a relocation bracket; some keep ACC in-bumper).
- Plow prep / sign mounts: accessories that key off the tow-hook mounts or front frame can coexist with the factory bumper (2017-current) but aren’t guaranteed with all aftermarket hooks.
Buyer/Installer Checklist
- Does the bumper retain OEM tow hooks (or include recovery points)?
- Is it parking-sensor ready (correct bezels/cups) and ACC compatible (or does it include/require a relocation bracket)?
- Any front camera obstruction notes?
- What’s the weight/material and coating, and do you need upgraded front springs for added weight (especially with a winch)?
- Do install instructions list bolt sizes/torques and sensor wiring steps?
- Does it match with the rear bumper? Do you care?
Bumper Replacement
Removal, Installation and Service Notes
- General removal (2011–2016 & 2017+ are similar): support the bumper, remove corner-support bolts and the four main bolts near the tow hooks, then lift off; tow hooks come off with six bolts and get reused on many aftermarket installs. Torque specs are provided by bumper makers; expect 9/16-in hardware in the ~70 ft-lb range.
- Sensor transfer: unplug fog lamps, pop out parking sensors and bezels from the OEM bumper, install in the new bumper’s cups, and route the harness cleanly to prevent false triggers. Some vendors provide dedicated guides for 2023–2024 trucks; the approach is similar on earlier years with sensors.
General Preparation (all years)
- Tools needed: 18–21 mm sockets/wrenches, ratchet, breaker bar, torque wrench, trim removal tool, flat screwdriver, jack stands/support.
- Safety: Park on level ground, chock rear wheels, disconnect battery if sensors/fog lamps will be unplugged.
- Support bumper: Have a second person or use a floor jack with wood block. OEM bumpers are heavy.
1999–2004 (First Generation)
- Remove lower valance (plastic air dam) — detach push-pin retainers and bolts.
- If equipped, disconnect fog-light wiring.
- Unbolt tow hooks (each has 3 bolts to the frame horns).
- Remove 4 main bumper mounting bolts (two per side inside frame horns).
- Slide bumper forward and off.
- Transfer brackets, tow hooks, and lights to replacement bumper.
- Reinstall in reverse order. Torque bumper bolts to ~75–85 ft-lb; tow hooks ~65 ft-lb.
2005–2007 (Facelift)
- Process is nearly identical to 1999–2004, but valance is shaped differently.
- Watch for integrated fog-light bezels. Unplug fog-light harness before dropping bumper.
- If converting ’99–’04 truck to 05–07 front clip, bumper requires matching grille/header panel for proper alignment
2008–2010 (Second Facelift Pre-2011 Redesign)
- Remove splash shields/valance push pins.
- Unplug fog lamps.
- Remove 4 bolts behind bumper attaching to frame horns.
- Pull bumper forward; tow hooks remain bolted to bumper brackets (unbolt if needed).
- Swap hardware to new bumper.
- Reinstall; torque ~80 ft-lb.
2011–2016 (Third Gen, Body/Chassis Redesign)
- Remove skid plate (if equipped)
- Detach lower air dam/valance (plastic push pins + bolts).
- Disconnect fog lamps and front parking sensors (if present). Carefully release sensors and bezels from bumper.
- Remove bolts securing tow hooks (3 per side).
- Remove 4 main bumper bolts at frame horns.
- With bumper supported, pull forward to clear frame.
- Transfer tow hooks, fogs, sensor bezels to new bumper.
- Reinstall in reverse order; torque bumper bolts 85 ft-lb, tow hooks ~65 ft-lb.
2017–2019 (Fourth Gen, Aluminum Body)
- Remove skid plate (13 mm bolts).
- Pop out lower valance (plastic clips/bolts).
- Disconnect fog lights, parking sensors, adaptive cruise radar module (lower driver side).
- Remove 4 large bolts inside frame rails (18/21 mm).
- Support bumper and slide forward.
- Transfer radar bracket, sensors, and fog lamps to new bumper. If installing aftermarket: relocate radar with kit bracket (required).
- Reinstall bumper, torque bolts ~100 ft-lb.
2020–2022 (Updated Fourth Gen)
- Same as 2017–2019, but extra attention to:
ACC radar: must be aimed/initialized after removal.
Front camera (if equipped): may need trim piece swapped. - Remove splash shields and valance.
- Disconnect fogs, sensors, radar, block-heater cable (if routed through).
- Remove frame horn bolts.
- Swap all electronics (radar, sensors, fogs, harness).
- Reinstall bumper, torque bolts to ~100 ft-lb.
- Perform sensor calibration (dealer scan tool required for ACC).
Important Bumper Replacement Notes
- Sensor handling: Always press out sensors with trim tool; don’t pry on wires.
- Adaptive Cruise: Aftermarket bumpers may obstruct radar — Ford and bumper makers specify a relocation kit + calibration.
- Alignment: Loosely thread all bolts, adjust bumper-to-fender gap, then torque.
Aftermarket Bumper Compatibility Flags to Check
- ACC & parking sensors: choose “sensor-ready” bumpers and/or buy a radar relocation bracket (DV8/ADD and others make them for 2017–2019; many 2020+ kits include provisions). Forum experience aligns: relocate or ACC won’t function.
- Front camera window: some list “works with front camera,” others warn of partial blockage. Read each product’s fitment notes
- Weight & materials: heavy-duty steel bumpers typically weigh 250–350 lb and use 3/16-in plate; coatings are usually 2-stage powder coat.
Bumper Replacement and OEM Specs
1999–2004 (First Gen, ’99–‘04 Super Duty)
OEM Details & Features
- Chrome or painted steel face bar with steel lower valance and integrated tow-hook openings.
- Compatible across F‑250/F‑350 of these years, even with grille swaps (e.g., from 2005–’07) — body mounts remain the same.
2005–2007 (Updated Exterior Styling)
OEM Details & Features
- Styling overhaul: new grille design inspired by the Mighty F‑350 Tonka concept, updated bumper shape, headlights, and thicker frame rails. (Front bumper matched these new aesthetics.)
Conversion Compatibility
- Many do 2005–2007 front-end conversions on a ’99–’04 truck (changing bumper, grille, headlights, header panel), but it requires matching grille/fenders.
2008–2010 (Before the 2011 Super Duty Redesign)
- This period maintained a similar bumper design as 2005–2007, with minor restyling. Aftermarket fitment largely remained consistent.
2011–2016 (Third Gen, Body/Chassis Redesign)
OEM Details & Features
- Complete chassis and body redesign approaching 2017, yet retained a steel front bumper assembly (valance design varied by trim).
2017–2022 (Fourth Gen, Aluminum Body)
OEM & Aftermarket Insights
- Body changed to aluminum, but OEM front bumpers continued as steel assemblies.
Advanced Feature Considerations
- Front-end sensors (parking sensors, ACC radar, forward camera) must be carefully accommodated.
- Many modern bumpers include “sensor‑ready” features and may require relocation brackets for ACC.
If you have any questions, feel free to reach out. If you are located near our Longwood store, you are always welcome to stop by. If you prefer to keep reading, we also have additional information about OEM versus aftermarket parts discussing bumpers further.
The Patriotic Philosopher of Possum County Billy Hill is what happens when a six-pack of root beer, a John Deere hat, and the U.S. Constitution have a baby in the back of a pickup truck. Hailing from the grand hills of somewhere-between-here-and-there, Billy proudly considers himself a “hillbilly” — but with a PhD in common sense and a minor in wrestling raccoons off his porch. With a mullet that flows like a bald eagle in slow motion and a wardrobe that screams “Walmart clearance aisle patriotism,” Billy doesn’t just love America — he is America. He celebrates the 4th of July so hard his neighbors file noise complaints with the bald eagle sanctuary three counties over. Billy’s life philosophy is simple: “If it ain’t broke, duct tape it anyway for extra freedom.” He doesn’t take life too seriously because, as he puts it, “Ain’t no point stressin’ when you got barbecue sauce and a recliner.” He believes everything in life can be solved with a grill, a beer, or a rousing debate about which state has the best gas station snacks. Billy once tried to start his own political party: The Red, White, and Brew Party: its platform consisting entirely of fireworks, lawn chairs, and banning low-fat anything. Whether he’s hunting invisible squirrels in flip-flops or giving unsolicited wisdom like “You can’t buy happiness, but you can buy bacon,” Billy Hill is the national treasure no one asked for, but America somehow deserves.
Subscribe to the Hillbilly Newsletter
Research
Need Help? Search our Articles.
